They each got their very own Jelly Fish! Now let me tell you I had some very excited 5th graders.

We went to the science lab and "made" jelly fish. If I was not their favorite science teacher, I am now.
Scroll to Top
Things you need to make your own jellyfish (Hope you can find all these in your kitchen) :
1. A transparent plastic grocery bag
2. A plastic water bottles.
3. Thread
4. Food coloring
5. Scissors
Instruction:
• Flatten the bag and cut off the handle and the bottom part (see picture 1)
• Cut along both sides (see picture 2) to split into 2 plastic sheets – by the way, we only use just one of them.
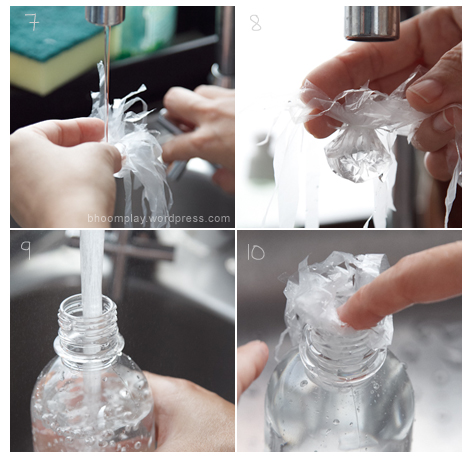
• From the center of the plastic sheet, fold it like a tiny balloon to make the head part and tie it with the thread – not too tight (see picture 3). You must leave a little hole in order to pour some water in the head part(see picture 7-8).
 • Now you’ll get the head balloon part and the remaining will be its tentacles. Cut from the edge up to the head part roughly. You’ll get for about 8-10 tentacles (see picture 4).
• For each of them, cut again into 3-4 small strings (see picture 5) – and just cut off the remaining part.
• Trim to make random long and short tentacles (see picture 6)
 When finished, you’ll get something like this (the left pile is all the pieces we cut off)
 • Put some water into the head part to make it be able to sink (see picture 7). You must leave some air inside to make be able to float up (see picture 8).
• Fill up your water bottle (see picture 9).
• Put your jellyfish in the bottle with a few drops of blue food coloring. Screw in the cap and that’s all. : )
A tip is to make the head of the jelly fish really fat and the tenacles not as long or full. It took us a lot of trial and error. BUT so much fun.
Happy Learning!
No comments:
Post a Comment