Valentine's Day is such a day of surprises...
My daughter is so excited that her wonderful boyfriend sent her flowers today. He had them delivered to her dorm. Now the exciting thing is that they go to different schools. So I must say that I was impressed too.
I was so excited for her...THEN I come home and my wonderful husband had these waiting for me.
My daughter and I are very blessed to have two such great men in our life. It is a Happy Valentine's Day indeed.
I hope everyone has a day filled with love. No matter how you celebrate, just remember that you are loved. God loves you.
Janice
Tuesday, February 14, 2012
Wednesday, February 8, 2012
IN THE CLASSROOM....
This week in math I needed to teach coordinate graphs! I am not that kind of teacher to stand in front of the classroom and teach. I like for my students to explore and discover...AND discover they did.
What a fun week we have had with the following stations:
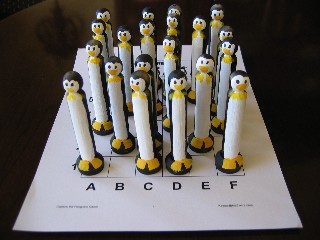
Station 1~ Grab the Candy Game: students toss two dice (one regular and one A-F) in this fun game that introduces students to coordinate graphing in the spaces. Students form a coordinate pair based on the dice toss and place a marker on that space, if possible. If the space holds a candy, they grab the candy for a quick five points
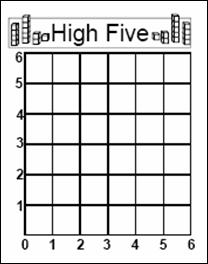
Station 2~ High Five Game which takes the Gridlock Game to new heights as students create coordinate grid buildings. Students continue to place markers on the coordinates created by tossing two dice but in this game, they can pile markers (small cubes) on top of each other to create buildings. The first player to place a marker that creates a four-story building wins the game. Add the data collection exercise so that students analyze the probability of this 3-D experience.
Station 3~
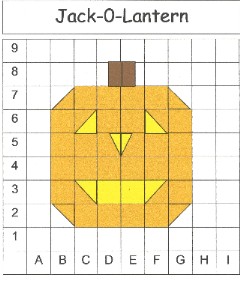
These activities encourage students to color coordinate pairs to create pictures.
Scroll to Top
Station 4~
6x6 game mat. Students use 2 regular dice to graph traditional coordinate pairs at intersections.
NOTE: Penguins pictured to the right were created by painting wooden clothespins and doll stands, both readily available at craft stores.
What a fun week we have had with the following stations:
Station 1~ Grab the Candy Game: students toss two dice (one regular and one A-F) in this fun game that introduces students to coordinate graphing in the spaces. Students form a coordinate pair based on the dice toss and place a marker on that space, if possible. If the space holds a candy, they grab the candy for a quick five points
Station 2~ High Five Game which takes the Gridlock Game to new heights as students create coordinate grid buildings. Students continue to place markers on the coordinates created by tossing two dice but in this game, they can pile markers (small cubes) on top of each other to create buildings. The first player to place a marker that creates a four-story building wins the game. Add the data collection exercise so that students analyze the probability of this 3-D experience.
Station 3~
These activities encourage students to color coordinate pairs to create pictures.
- Download Jack-o-Lantern
- Download Mad Monster?
- Download Gingerbread House
- Download Boots
Scroll to Top
Station 4~
6x6 game mat. Students use 2 regular dice to graph traditional coordinate pairs at intersections.
Saturday, February 4, 2012
IN THE CLASSROOM....
A Perfect Unit on Inferring...
Students alwas seem to want to blame each other for "things" in the classroom. So I took this as the chance to turn it into a lesson on Inference. You can assume many things. I show them pictures and let them try to figure out what is going on in each picture. I get many, many different opinions. Students must back up their inference! They then try to presuade others to their side. It is a fun lesson and then I do not have chidren accusing each other so much in the end.
Scroll to Top
Inference: Why is this man on the floor? What makes you think so?
Inference: What are three things you can tell about the person who these feet belong to?
(This is my favorite!)
Scroll to TopScroll to TopScroll to TopScroll to TopScroll to TopScroll to TopScroll to TopScroll to Top
Students alwas seem to want to blame each other for "things" in the classroom. So I took this as the chance to turn it into a lesson on Inference. You can assume many things. I show them pictures and let them try to figure out what is going on in each picture. I get many, many different opinions. Students must back up their inference! They then try to presuade others to their side. It is a fun lesson and then I do not have chidren accusing each other so much in the end.
Scroll to Top
Inference: Why is this man on the floor? What makes you think so?
Inference: What are three things you can tell about the person who these feet belong to?
(This is my favorite!)
Inference: How is this girl feeling? What makes you think so?
(Student's favorite)
Inference: What is this man going to say to this girl? Why do you think so?
I have many more pictures we have fun with...
Happy Pinning...(From Pinterest)
Tuesday, January 31, 2012
IN THE CLASSROOM....
This week, my students are taking our state MAP test. We are reviewing and taking break from our curriculum so I do not overload their brains this week. I have been sharing some Math activities we have been doing, so I thought I would share some Science activities...
"A boy left his bike chained to a tree when he want away to war in 1914. He never returned, leaving the tree no choice but to grow around the bike."
Students worked together at this station to discuss how this happened. They brainstormed their ideas and made a circle map. As they rotate each group adds to the map.
Students loved this station. We had previouse studied environments. They wrote a R.A.F.T from the turtles point of view about his environment and what he is thinking about! This is in their AJ's and we shared them at the end of the day. Several students illustrated their RAFTS.
This was the absolute favorite picture of the day! I used this as a creative writing station to review for PASS in the spring. Can you imagine the stories I got about being a "clear frog". AND yes this is a real frog.
Finally they practiced their observation skills!
Love this for practicing observations, inferences and predictions.
Hope this inspires you in your classroom with your students!
Happy Learning...
scroll to TopScroll to Top
Scroll to TopScroll to TopScroll to TopScroll to Top
Monday, January 30, 2012
In the Classroom...
While searching for activities this week in Math, I can across the perfect game for my students to play to help review for MAP testing next week...
I ran across a game that teaches area and perimeter. It was described by G. Sims "Husker" in her review of Dice in Dice on Amazon. She calls it the Real Estate Game. You will need Graph Paper and Colored Pencils. 1. Roll one dice in dice and use those numbers as the sides of the area of your land plot. 2. Draw the fence line around your plot. The fence line forms the perimeter of your plot. 3. Write the multiplication problem in your plot. 4. Color in your plot with a colored pencil. You will be coloring in the area of the plot. This game is played in pairs. When there is no more room to place your next plot of land, the game is over. The player with the most land area is the winner. You might also consider laminating a few grids and using dry erase markers instead of colored pencils and graph paper." Great idea.
We have been playing this for two days, and they are still not finished! They have strategized, plotted, and planned what is the best way to lay out the area on their grid. Then get excited if they roll a 1 x 4 on the dice. I have to roll for them on occasion since I have the "magic touch". It has been a great review lesson.
Scroll to TopScroll to Top
Friday, January 27, 2012
In the Classroom...
Today I realized that something I had posted had drawn a lot of attention...
I have this posted outside on my bullentin board. My students and even teacher come down the hall and read the various announcements on it. Slowly these little "compliments" have dissapeared. One young man stuck his head in the door and ask me if I had any more compliments. I looked at him and then remembered. I had forgot I put this up. I went outside and just the top was there. All the compliments were gone. I pulled another out of the folder and put it up for him. He just smiled and said thanks. He told me it was nice to know someone cared enough to put this up for the kids...
We all need compliments. Post this and see what happens in your "work" place.
(Another idea from Pinterest)
Happy Learning...this time I learn from my students!
Thursday, January 26, 2012
In the Classroom...
In the world of Science, my students this I rule. So in the effort to be top dog in their eyes, I am always on the look out for really cool science. On Pinterest this week I found it. We are studying the Ocean, and I surprised them today by telling them I was giving each of them a pet to take care of during this unit.
They each got their very own Jelly Fish! Now let me tell you I had some very excited 5th graders.
We went to the science lab and "made" jelly fish. If I was not their favorite science teacher, I am now.
Scroll to Top
Things you need to make your own jellyfish (Hope you can find all these in your kitchen) :
1. A transparent plastic grocery bag
2. A plastic water bottles.
3. Thread
4. Food coloring
5. Scissors
Instruction:
• Flatten the bag and cut off the handle and the bottom part (see picture 1)
• Cut along both sides (see picture 2) to split into 2 plastic sheets – by the way, we only use just one of them.
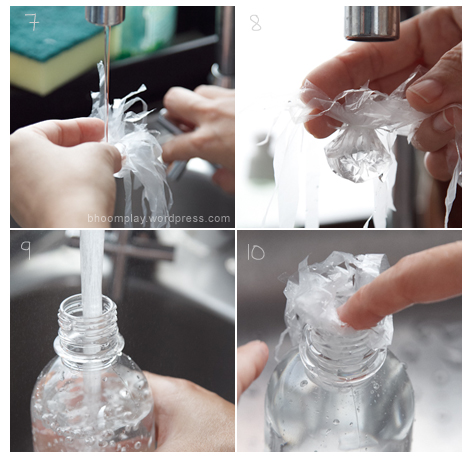
• From the center of the plastic sheet, fold it like a tiny balloon to make the head part and tie it with the thread – not too tight (see picture 3). You must leave a little hole in order to pour some water in the head part(see picture 7-8).
• Now you’ll get the head balloon part and the remaining will be its tentacles. Cut from the edge up to the head part roughly. You’ll get for about 8-10 tentacles (see picture 4).
• For each of them, cut again into 3-4 small strings (see picture 5) – and just cut off the remaining part.
• Trim to make random long and short tentacles (see picture 6)
When finished, you’ll get something like this (the left pile is all the pieces we cut off)• Put some water into the head part to make it be able to sink (see picture 7). You must leave some air inside to make be able to float up (see picture 8).
• Fill up your water bottle (see picture 9).
• Put your jellyfish in the bottle with a few drops of blue food coloring. Screw in the cap and that’s all. : )
A tip is to make the head of the jelly fish really fat and the tenacles not as long or full. It took us a lot of trial and error. BUT so much fun.
Happy Learning!
Wednesday, January 25, 2012
Has it been that long....
I cannot believe it has been that long since I have made a post. I have been so busy with school, grad classes and home that my blog has just not been on my mind. I read so many good blogs, it is hard to imagine that anyone would read mine.
Just incase there is anyone that does, I have some great ideas to share...
http://classroommagic.blogspot.com/2012/01/valentine-goodies.html is a great new blog that I am following.
Check out this idea for a Valentine activity for your class. Stock up on converstaional hearts. My kids are going to love this. This site is full of activity matts for your class.
My newest hobby is Pinterest. I get so many ideas for my classroom from there.
Scroll to Top
This is the newest thing that I give my kids...They think it is a cool way to get their thought out. They like to save them in their AJ's and go back and add to it.
Scroll to Top
I just found this...Cannot wait to share it tomorrow.
Happy pinning...
Subscribe to:
Posts (Atom)